


Food photography dos and don’ts for small businesses
- Ripl Team

- Jan 28, 2022
- 8 min read

If you run a restaurant, bakery, food truck, or any other food-related service then you probably understand the impact that having a strong social media presence can have on your business. Food photography is among the most popular photography categories on social media. With so many food-related posts in the social media feed, it can be difficult to stand out from the crowd.
Food is not only your passion, but it’s also your livelihood, which puts a lot of pressure on making quality posts that represent your business. You should feel as confident in your social media photos as you are in the quality of your menu items. You might already have a well established collection of posts and followers or maybe you are just starting out.
Either way, here are some food photography tips that will help as you build your presence on social media:
Before digging into this list of tips, let’s first cover an important mindset that should become your guiding principle as you craft each of your photos.
Your social media posts are a reflection of your business and your brand. Your images should project the same quality, consistency, and personality that you want your audience to perceive of your business.


1. Come Up With a Plan
It's important to have a clear vision for the end result before you prepare and plate your delicious products for a photoshoot. There are so many factors that go into creating the perfect shot: lighting, framing, composition, colors, props, and the food itself. Trying to mentally organize these factors into a cohesive vision can be overwhelming and you might be tempted to wing it.
Don’t: wing it! Putting in a little planning ahead of time will go a long way.
Do: spend a few minutes consuming visual inspiration on the web before you plan your photoshoot. Gathering inspiration is a great way to add clarity to your vision and will take most of the guesswork out of planning and preparing the perfect shot. There is an endless supply of inspiring imagery on the internet that you can access in a keystroke. Try searching Google images or Pinterest for the dish that you’re planning to photograph. Take some mental notes when you come across material that aligns with how you want to represent your food, business, and brand on social media:
Does the lighting match the mood that you want to convey?
Do the colors work well together and enhance the visual appeal of the dish?
Is the framing and composition interesting?
Does the background and environment represent the vibe that you want in your photos?
Are the props and surrounding elements cohesive, supporting the dish and adding to the overall interest?
After you have scrolled through a large sample of food photography you’ll probably feel inspired by the creativity in some photos, but you might also feel a little discouraged by the complexity. A lot of the photos that you come across will be professional shots that took several hours of set up and were captured with state-of-the-art camera equipment then processed in professional editing software. Don’t be discouraged! You can produce amazing food photos even with a humble smartphone by following some of our next few tips.


2. Properly Light Your Setting
Proper lighting is foundational when it comes to taking quality photos. Photos taken without considering light sources tend to have a “snapshot” feel – the shadows are often too harsh, the highlights are sometimes too bright, and the colors might seem a little off. Controlling the light in your scene will keep your photos from looking like snapshots and will go a long way towards making each shot look professional and amazing.
Do: figure out a range of light that works well with your equipment. When you snap a digital photo, there’s a sensor behind your camera lens that captures the light in that instant and turns the information into a digital image. Some sensors are better than others. A good camera can capture a wide range of dark and light in a single shot without sacrificing any detail. Most entry-level cameras, including smartphone cameras, will be fine somewhere in the middle but tend to struggle capturing details in the darkest and lightest areas of the shot. If you don’t have access to a high quality camera, it's not a problem! You can still take amazing photos by lighting your shot in a range that your camera can handle.
Do: use a prop as your subject when calibrating the light in your scene. Sometimes getting the right amount of light in your scene can take several minutes of adjustment and you shouldn’t sacrifice the freshness of your dish in the process. Before preparing and plating your food, try photographing a prop and adjusting your lighting until you capture the sweet spot where your prop is evenly lit and you can zoom in and see that the details are still sharp. Once you have a lighting solution that you’re happy with, it’s time to prepare and stage your dish for its photoshoot.
Don’t: use your camera flash! Resist the temptation to activate your flash when you need to add more light to your subject. Bright light sources pointed directly on your subject can result in capturing harsh shadows and overexposed highlights and it’s not a flattering look for food.
Do: make sure that you have enough light to work with. When it comes to food photography, generally soft natural light is the way to go. Try setting up near a large window during golden hour or during an overcast day. If the sunlight seems too harsh, hang a white sheet across the window to diffuse the light more evenly across your setting.
If you find that the images don't quite pop the way that you intended in the available light, you can easily fine-tune the brightness, contrast, and saturation in a photo editor as long as you have enough light and detail to work with in the original image.
Don’t: apply dramatic photo filters. Food photography is probably the one category where it’s best to stay away from dramatic filters. Applying a filter might feel like a good way to add some artistic flair to your photo when you aren’t satisfied with the original shot, but you should use restraint when it comes to filters that dramatically transform the resulting image. Have you ever seen a black & white food photo that looks appetizing? Neither have I.
Don’t: use dramatically warm or cool lighting. When your lighting is too warm, your image coloring will be tinted yellowish orange and when your lighting is too cool, your photo takes on a bluish cold tone. Tinted colors are not ideal when it comes to food photography. If you notice that your shots are tinted warm or cool, you can often correct the coloring by adjusting your white balance in a photo editor, but adjusting the white balance can also take away from the natural colors of your food. Do your best to avoid lighting that affects the colors of your dish.


3. Experiment With Different Angles and Framing
This is probably the simplest tip to try, and yet it can make the biggest impact in adding interest to your photos. The easiest way to mix things up is to experiment with different camera angles and cropping.
Don’t: limit yourself to menu-style shots. The purpose of a menu photo is to capture the entire dish so your customers have a clear idea of what they are ordering. You can (and should) feel comfortable sharing your menu photos on social media, but don’t stop there!
Do: get creative with your framing. Take creative risks. Dial up the level of interest. Try framing one of your shots so that only half of the plate is visible. Try taking a shot from slightly below the plate then directly above. It only takes a few seconds to reposition your camera and snap from another perspective, so don’t be afraid to try out new angles and distances. Keep the photos that are creative and interesting and delete the photos that ended up feeling awkward.


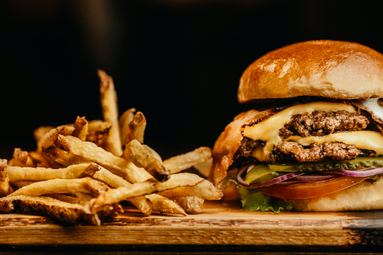
Do: Highlight the aspects of your cuisine that you are proud of with close up shots. Highlighting details that show the love and care that you pour into your craft is perfect content for social media! If you take pride in the quality and freshness of your ingredients then you should focus on individual key ingredients. If you execute the perfect garnishment, the perfect steak sear, or the perfect icing on a cupcake, you should be showcasing your skills in close up format.
Pinch-zooming with a smartphone or cropping to a smaller area of your photo will not give you the same results as positioning your camera close to your food, so be sure to move your camera close to your food when taking those detailed shots.


4. Stage Your Setting
This tip will generally require more time and preparation than the other tips, but it’s also the step that will add the most personality to each image and will make your posts stand out on social media.
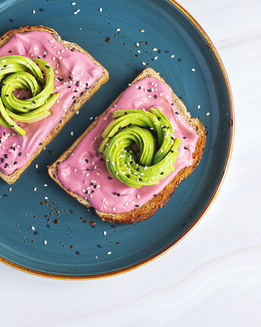
DO: pick a setting that creates the right environment for your shot. You will want the environment of your shot to capture a setting that suits your brand. If you sell colorful baked goods and sweets, make sure that your setting feels bright and cheerful. If you are photographing a breakfast plate, capture the feeling of the morning by including lots of natural light and creating a relaxing atmosphere. If your business focuses on evening dining, keep the setting lights low and use localized lighting to create an evening vibe.
Setting up in your restaurant or storefront is often a great option for capturing the atmosphere of your business. If you want to create a setting that is free of distractions, try placing your food next to a textured backdrop, which can be a wall, a tablecloth, or colored paper.
Do: Add props and elements to your scene. This is a great way to add layers of interest and it’s an opportunity for your brand to show. Consistency and balance is key. It can be difficult to know how much is “too much” when it comes to balancing the placement and number of props in your scene. If you find yourself second guessing your arrangement, do a quick Google image search and find a photo that has a well-executed balance of objects then try to achieve a similar balance in your own setup.
Stick with elements that reinforce the mood and setting of your shot. If you run a bar & grill then use objects with wood and iron texture. If fine dining best describes your business then you will want to keep your scene tidy and use props that include colors that represent elegance and class. If you’re struggling to come up with props that pair well with your main dish, try using some of the ingredients or elements that are part of the dish and make use of the utensils that go alongside the serving.
Don’t: let the props compete with the subject. When you see that a prop distracts from the main dish, you should consider leaving it out or making changes to bring the focus back to your intended subject. Are the prop colors more vibrant than the subject? Does the prop disrupt the balance and cohesion of the overall composition? Does the prop feel more like the subject than the main dish? If the answer is “yes” to any of these questions then you should make adjustments.


Do: try adding a human element to your scene. Adding a human to your photo can be an effective way to connect your audience with your photo. Placing a person (or part of a person) inside your shot instantly creates a connection to the person in the shot and it becomes easy for your audience to imagine themselves in the scene. Something as simple as a spoon lifting a bite of your food or a set of hands holding a burger can be an effective way to get your viewers to picture themselves about to take that first bite.
Don’t: let the human become the focus. When you include someone’s face in your photo, it’s natural for the viewer’s attention to analyze the person’s features before the food. The human unintentionally becomes the subject when the face is in frame and in focus. A way to ensure the person does not compete with the intended food subject is by keeping their face out of frame or out of focus.


We hope that you found these tips helpful and inspiring. It’s time to create and share some delicious images!


Comments